

- By - Gaurav Masand
- Posted on
- Posted in AI, AI tools, ChatBOT, openai, technology, tips and ticks, Uncategorized
- 1 Comment
Revolutionize Your Writing with AI Agents: Meet AUTO-GPT and BABYAGI – No Paid APIs Required!
Introduction
Are you a writer struggling to find the right words? Or perhaps you’re just looking for an innovative way to boost your productivity? Whatever your needs may be, AI agents like AUTO-GPT and BABYAGI are here to revolutionize the way you write – and the best part is, you don’t need to pay for any APIs!
At a time when paid APIs can be a barrier to entry for some, the Free-AUTO-GPT-with-NO-API repository on GitHub is a welcome solution. With the latest developments in natural language processing and machine learning, you can explore new possibilities in content creation, text generation, and even creative writing.
Whether you’re a seasoned writer or a curious beginner, this project is accessible and user-friendly. Plus, you can get involved by opening an issue or contributing to the project. So why not try it out for yourself? Head over to the notebook on Colab and see what you can create with these powerful AI agents. Just remember to use them responsibly and at your own risk!
Advantages of Repository
In recent years, there has been a growing concern about the lack of accessibility and affordability of AI technology. While big companies are making huge profits from their AI applications and discoveries, small businesses and individual projects are often left behind due to the high cost of using paid APIs.
This is where projects like Autogpt and BabyAGI come in. These autonomous AI agents are capable of performing various tasks, but unfortunately, they only work with paid APIs. That’s why I decided to create a free and open-source version of Autogpt that doesn’t require any API or special hardware.
I believe that democratizing AI is crucial to promoting innovation and progress. By providing free and open-source AI tools, we can create more equitable access to technology and empower small businesses and individuals to pursue their own AI projects without significant financial investment.
In this blog, I will be introducing you to this open-source version of Autogpt and BabyAGI, and showing you how you can use them to revolutionize your writing, content creation, and more. So let’s get started!
How to get ChatGPT & HuggingFace Token Free 🔑🔐
- HUGGINGFACE🤗 : Visit this simple official guide
- CHATGPT🖥 : visit this site and copy the “accessToken” only the token!

How to Run🐫
- To run Camel, you have two options: you can either run it on Colab or run it locally on your machine.
- To run it on Colab, click the “Open in Colab” link provided.
- However, be aware that abusing this tool is at your own risk.
- If you prefer to run it locally, you’ll need to download the FREE AUTOGPT REPOSITORY from the provided link.
- Next, you’ll need to install the required packages by running “pip3 install -r requirements.txt” in your terminal.
- Finally, you can run Camel by typing “streamlit run Camel.py” in your terminal.
- To use Camel, you’ll need a free token which you can obtain from the provided link.
- Once you have the token, paste it into the input field in Camel and start using this powerful tool.
How ot Run Baby AGI 👶
To run it on Colab:
- Click the “Open in Colab” link to access the notebook.
- Note that abusing this tool is at your own risk.
To run it locally:
- Download the FREE AUTOGPT REPOSITORY from the project’s GitHub page.
- Install the necessary requirements using pip3: “pip3 install -r requirements.txt”.
- Use the following command to run BabyAGI: “python BABYAGI.py –hf_token YoUrHFtOkEn –chatgpt_token YoUrChATgPTtOkENisSOlOnG”.
- Be sure to replace “YoUrHFtOkEn” with your Hugging Face token and “YoUrChATgPTtOkENisSOlOnG” with your ChatGPT token.
How to Run AutoGPT 🤖
To run Autogpt:
- Option 1: Run Autogpt on Colab by clicking on the “Open in Colab” button. Be aware that abusing this tool is at your own risk.
- Option 2: Download the repository for free and run it locally on your own computer.
- After downloading the repository, navigate to the directory in your terminal and run the command “pip3 install -r requirements.txt” to install the necessary dependencies.
- Once the dependencies are installed, you can use Autogpt by running the command “python AUTOGPT.py –hf_token YoUrHFtOkEn –chatgpt_token YoUrChATgPTtOkENisSOlOnG”. Make sure to replace “YoUrHFtOkEn” with your Hugging Face token and “YoUrChATgPTtOkENisSOlOnG” with your ChatGPT token.
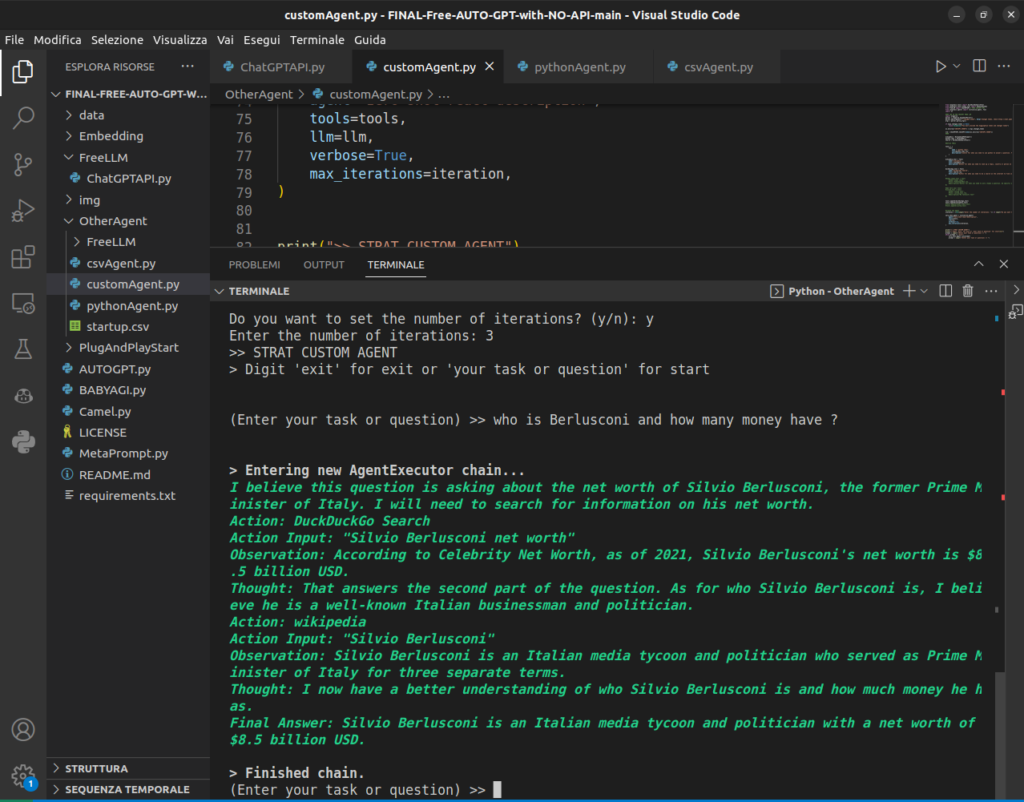
How to Run Your Custom Agent🤖
- To run the Autogpt project on Colab, click the “Open in Colab” button.
- Keep in mind that abusing this tool is at your own risk.
Alternatively, you can run the project locally:
- Download the FREE AUTOGPT REPOSITORY from the project’s GitHub page.
- Install the required dependencies by running “pip3 install -r requirements.txt”.
- Navigate to the “OtherAgent” directory.
- Choose or develop your own agent by modifying one of the available files (csvAgent.py, pythonAgent.py, customAgent.py).
- Run your agent using the following command: “python YourAgent.py –hf_token YoUrHFtOkEn –chatgpt_token YoUrChATgPTtOkENisSOlOnG”. Be sure to replace “YourAgent.py” with the name of your chosen agent file, and replace “YoUrHFtOkEn” and “YoUrChATgPTtOkENisSOlOnG” with your Hugging Face and ChatGPT tokens, respectively.
HOW IT WORK ? 🔨🔩
- We performed a reverse engineering process on ChatGPT, an AI language model developed by OpenAI, to create a version that does not require paid APIs or specific hardware.
- This allowed us to use the agents and new technologies of LangChain for free.
- We created a custom LangChain LLM (Language Model Microservice) wrapper, which can be used as a plug-and-play solution with any LangChain function or tool.
- To start a new chat, instantiate a ChatGPT object with your token using the following code:
from FreeLLM import ChatGPTAPI
llm = ChatGPTAPI.ChatGPT(token="YOURTOKEN")
- Alternatively, if you want to start from an existing chat, use the following code instead:
llm = ChatGPT(token="YOUR-TOKEN", conversation="Add-XXXX-XXXX-Conversation-ID")- To generate a response based on a given prompt, use the following code:
response = llm("Hello, how are you?")- Finally, print the response using the following code:
print(response)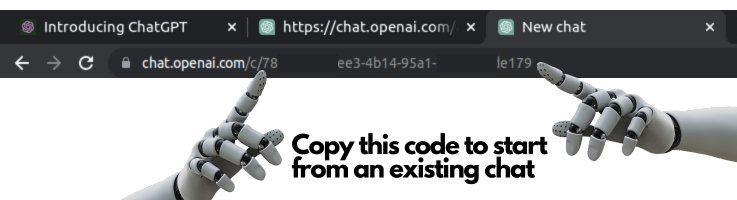
The custom ChatGPT LLM class we created is an excellent example of an agent that can be created for free in less than 60 lines of code. It provides internet access, Python code execution, and Wikipedia knowledge, making it a powerful tool for small businesses and individuals.
With our open-source version of Autogpt, we hope to promote equitable and diverse access to AI technology and empower more people to create innovative AI projects without the need for significant financial investment.
By using our ChatGPT LLM class, you can easily interact with the language model and generate responses based on given prompts. However, it’s important to note that the ChatGPT API has a limit of 50 requests per hour for each account. To avoid exceeding this limit, we implemented a call counter in our ChatGPT class.
Overall, we’re excited to share this free and open-source tool with the AI community and see what new and innovative projects can be created with it.
from langchain.agents import initialize_agent #use for create new agent
from langchain.agents import initialize_agent, Tool
from langchain.utilities import PythonREPL #tool for execute python script
from langchain.utilities import WikipediaAPIWrapper #tool get wiki info
from langchain.tools import DuckDuckGoSearchTool #tool get interet live info
from FreeLLM import ChatGPTAPI # FREE CHATGPT API
# Instantiate a ChatGPT object with your token
llm = ChatGPTAPI.ChatGPT((token="YOURTOKEN")
# Define the tools
wikipedia = WikipediaAPIWrapper()
python_repl = PythonREPL()
search = DuckDuckGoSearchTool()
tools = [
Tool(
name = "python repl",
func=python_repl.run,
description="useful for when you need to use python to answer a question. You should input python code"
)
]
wikipedia_tool = Tool(
name='wikipedia',
func= wikipedia.run,
description="Useful for when you need to look up a topic, country or person on wikipedia"
)
duckduckgo_tool = Tool(
name='DuckDuckGo Search',
func= search.run,
description="Useful for when you need to do a search on the internet to find information that another tool can't find. be specific with your input."
)
tools.append(duckduckgo_tool)
tools.append(wikipedia_tool)
#Create the Agent
iteration = (int(input("Enter the number of iterations: ")) if input("Do you want to set the number of iterations? (y/n): ") == "y" else 3)
zero_shot_agent = initialize_agent(
agent="zero-shot-react-description",
tools=tools,
llm=llm,
verbose=True,
max_iterations=iteration,
)
# Start your Custom Agent in loop
print(">> STRAT CUSTOM AGENT")
print("> Digit 'exit' for exit or 'your task or question' for start\n\n")
prompt = input("(Enter your task or question) >> ")
while prompt.toLowerCase() != "exit":
zero_shot_agent.run(prompt)
prompt = input("(Enter your task or question) >> ")
With this “CUSTOM LLM WRAPPER” now u can build or test your LLM APP’s WITHOUT PAYing


Donald Obrien
I like the helpful information you provide in your
articles. I will bookmark your weblog and check again here
frequently. I am quite sure I’ll learn a lot of new
stuff right here! Good luck for the next!